Showing posts with label Tech Shop. Show all posts

Monday, May 6, 2013

Electrical Nightmares

When I bought the bike, the owner had put an inline switch to the low beam headlight so it could be switched off durring the day to save battery (from earlier posts: the stator wouldn't charge the battery).  As I was putting things back together, and trying to clean things up. I decided to do away with the ugly indicator box between my two gauges.  I decided it was important to keep the indicators though so I went hunting for a discrete place to hide the parts.  I knew there was room under the fuse box, so I sat down and did some thinking about how I could stash it al there.  I had already removed the old fuses and replaced it with a custom fuse setup that allowed the typical easy to find blade fuses, so there was plenty of space under here now.
I ordered up a bunch of LEDs and consulted the wiring diagram, to solder up a new design.  On a small project board from RadioShack, I rebuilt the light box with a few resistors to match the specs of the original box and not burn out my LEDs.  While I had the whole unit apart, I also powder coated the hardware with the matching white of the tank and fenders. (picture to come)
Everything looked nice but there was an odd gap between the gauges, so with the help of TechShop and my brother who had taken the water jet class, I designed a new bracket that had mounts exactly where I needed them and got a perfect fitting piece.  I'll try and post a picture of the finished set up in the next day or two.

Monday, April 8, 2013

Seat Design

With the bike stripped down and the engine out, and with nothing to do but wait for new parts, I decided to start customizing a little.  I searched the web for a bit for ideas, and found a bike similar to what I was hoping to build, posted on Pipe Burn.  I dropped this image into photoshop and edited up this:

Following this virtual modification, I went for the seat.  Removing the former cover and drawing the new shape on the old foam.  From this sketch, I cut the foam on a band saw, I shaped a rough version.

Using an angle grinder with one of the wheels with staggered sand paper, I shaped the corners and details I was looking for.

Finally, I cut the seat pan down to match the new shape of the seat.  This resulted in the pan not having any structural components anymore, so I ended up scrapping the part all together and just fabricating a new part from some 16 g sheet steel. This is the old pan after I cut it down:

For the new pan from scratch, I put mocked the shape up with some card board, then laid it flat on my steel.  I then cut this shape out with a bandsaw and made the contour bends on the edge of my bench with a few clamps holding the pan in place.  The pan was still a bit wobbly, so I took it over to the english wheel and with some channel rollers, put a nice channel through the flat parts of the pan, adding a lot of rigidity and strength.  I then lined the pan up to the bike and marked exactly where I would need to add tabs for clipping/screwing it down to the frame.  Since I planned on mounting my taillight to the seat, I welded a tab at the back.  Lastly a line of holes drilled around the outside perimeter for some rivits to hold down the vinyl finished off the build.  

A shot of the seat pan being fitted:

Saturday, March 30, 2013

Naming the Beast and Starting the Rebuild.

 After riding the bik for a week, I discovered that the battery issue and electrical problems generally resulted in the bike dying before I made it to my destination.  After numerous sweat inducing roll starts around the hills of SF, I decided it was time to get into this monster and fix it.  On my way to Tech Shop to start my project, the bike died halfway up Gough and I rolled to a stop on a side street.  Stepping off, I began running next to the bike to roll start it.  Next to the busy street, I was rushing and let the bike lean a little too far past it's balance point.  Unable to right the teetering moto, I let it drop for the first time.  Standing there looking at the overturned bike was like looking down at a dead beloved pet; I was starting to get attached to this ugly monster.  On my way to the shop I realized that the bikes inability to make a successful trip was like Icarus, getting too close to the sun, and never making it to his destination, and thus my ride had it's new name.  

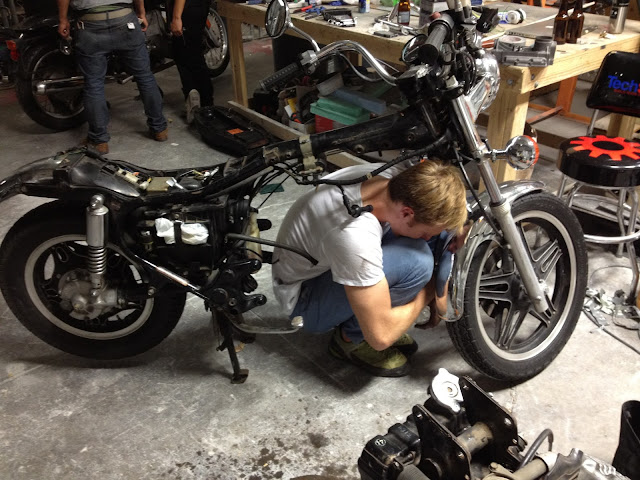
My first mission was to remove the fairing and excess plastic.  Shortly after, I soon found myself disassembling the entire beast, to get things down to where I could actually fix this mysterious stator, that I now understood as the electrical heart of Icarus.  Having unbolted the engine, I turned to brute strength to get it off it's mounts where it had faithfully hung for 30 years.    It didn't come easily, but eventually separated, and the remainder of the bike sat gutted on it's center stand.  In 5 hours I had taken my running bike and created a mess of parts and bolts, that with luck, would go back together.
I jokingly climbed under my bike where the engine was and simulated a 1 Noah power bike. With the engine out, I began reading up on the steps I needed to take to get down to the stator.